
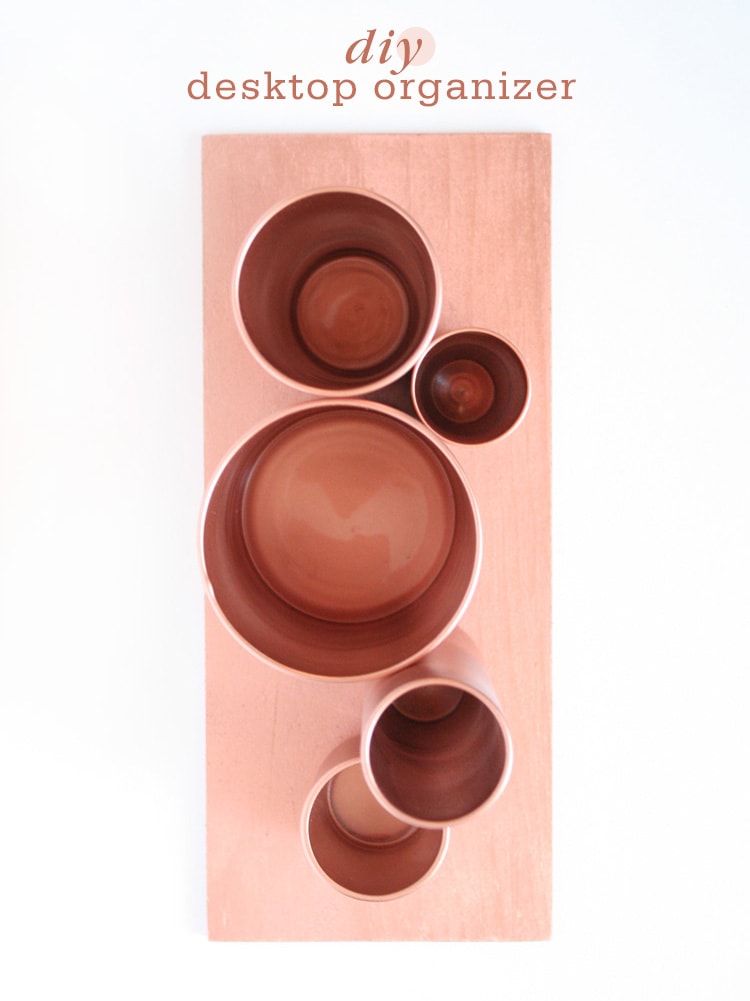
Couldn't we all use a little more organization in our lives? Marisa has the perfect DIY solution to our messy desks and it couldn't be more chic!
"It’s a new year and that means a new set of goals to stick to! One of my resolutions is to stay more organized in 2014. It seems like my desk is always one of the hardest places to keep tidy! I found this beautiful desktop organizer from Anthropologie and it inspired this DIY. " - Marisa
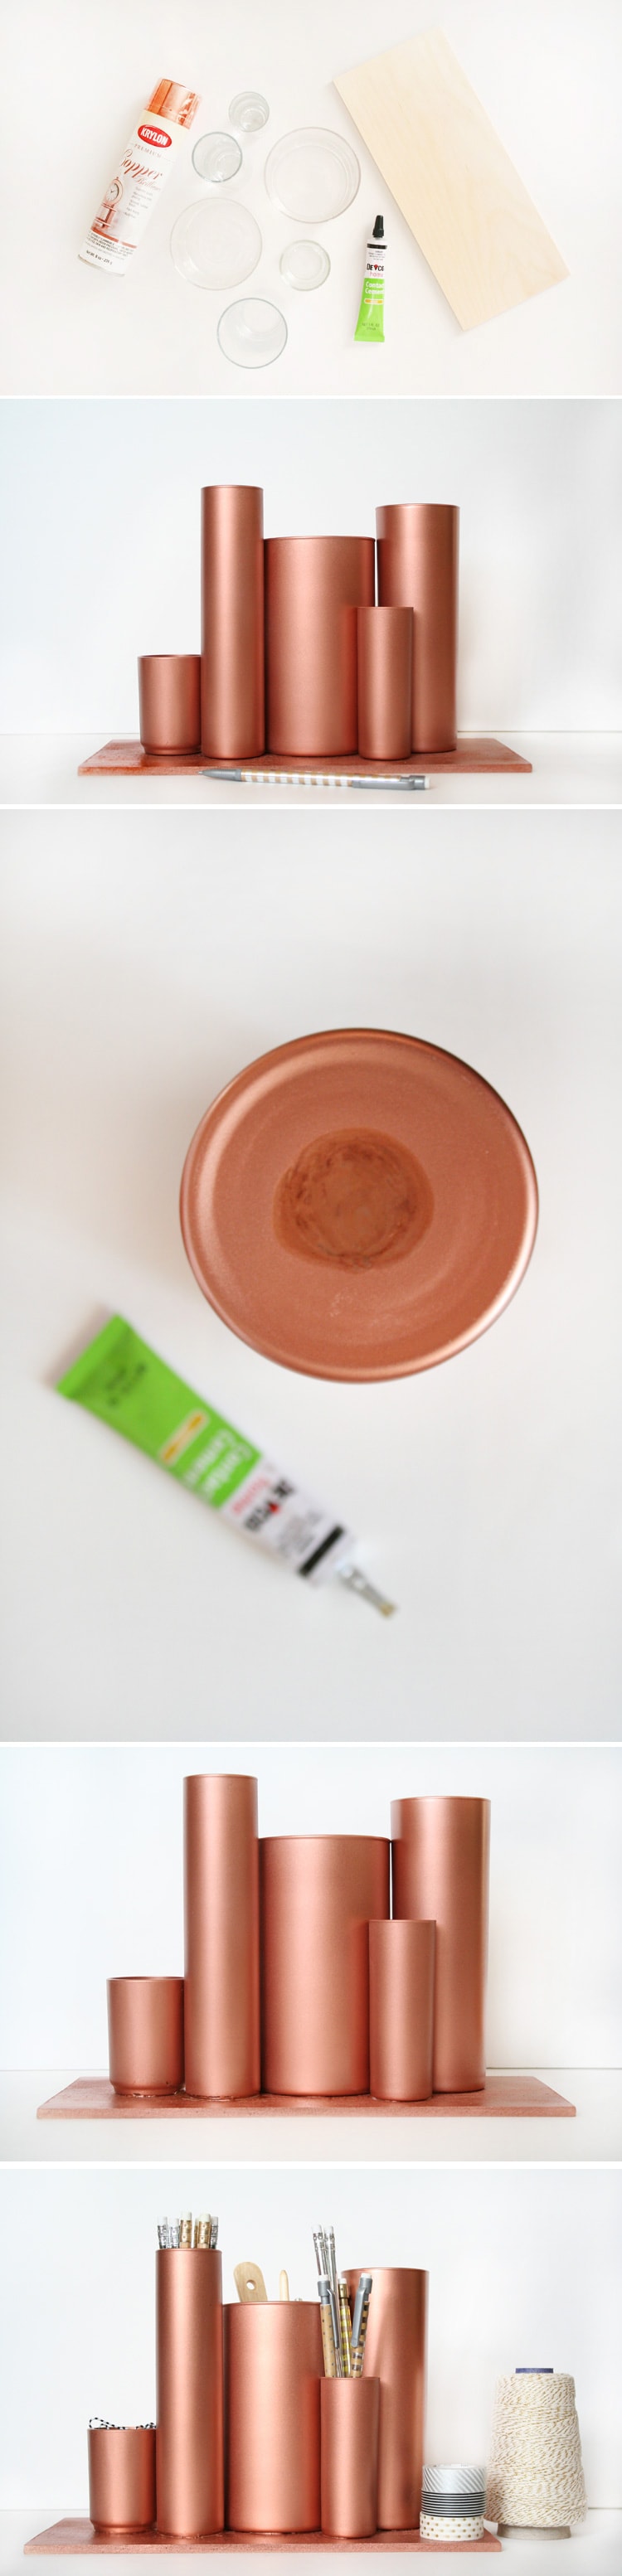
To make this desktop organizer, you will need:
Glass Cylinders in various sizes (Michael’s, World Market, dollar store)
Small clear pine craft wood board (Michael’s-5.25 x 12in)
Contact Cement (Hardware Store)
Metallic Spray Paint (Hardware Store)
Pencil
Sand Paper (optional)
 photos by Marisa Mangum
Let's Get Started:
1. First, clean your glass cylinders thoroughly.
2. Before spray painting, you may want to do a little prep work: If your board is rough, sand it down a bit with some sand paper. Lay out your cylinders on your board in an arrangement you like. Take a photo on your phone so you can quickly setup your cylinders in that same arrangement when it comes time to glue them to the board.
3. Spray paint your cylinders and board. I recommend doing several thin coats, letting each coat dry for about half hour to an hour in between. After your last coat of spray paint, let everything sit and dry completely for at least 2 hours (or according to the instructions on your spray paint bottle).
4. Once everything is dry, lay out your cylinders on your board exactly where you want them to be, and lightly “outline” underneath the base of each cylinder with a pencil onto your board.
5. One by one, begin gluing your cylinders. I recommend starting on one end, leaving all of your cylinders in place and removing one at a time to apply glue & bond to the board. Tips on gluing: Read the instructions on your glue carefully; the glue I used instructed that I apply glue to both the cylinder and the board, and wait until the glue is a tacky texture before bonding. Press firmly for several seconds. Continue down the line until all cylinders are secured, and let sit for a bit before handling. If you apply too much glue, have a plastic knife or another tool handy to carefully scoop off the excess glue before it dries. I learned the hard way with my first cylinder. A little glue goes a long way!
6. Once your glue is dry, give the entire organizer a final light coat of spray paint & let dry completely before filling with your lovely desktop items!


Chelsea Tubbs says
The copper paint is GORGEOUS Marisa! I love clever little ways to stay organized and I'm always down for a little Anthro copycatting.
Valerie C (@itsvaleriec) says
the copper is so pretty! i've been looking for easy ways to integrate more eye-popping copper shades in my home. i think this may be it! thanks for sharing, marisa. 🙂
xx, valerie @ lily on fillmore
Joelle says
Love the look, you really nailed the inspiration for a lot less which I always admire, but you can save even more money by using cardboard coffee containers (the tin ones have ridges which is a different look), TP rolls, PT (paper towel) rolls, plumbing pipes and/or a tuna can instead of glass vases/candle-holders. This way, not only do you save money but the environment while you are at it. For the smaller containers (tuna can-sized) I'd place a good quality magnet (really strong ones are free inside your old electronics like computer hard-drives) into a groove cut in the wooden board just under it to keep paperclips tidy.
Leah Bergman says
Great recommendations! I especially like the idea of using old coffee containers and cans. Thanks!
Rachel says
This is beautiful! The copper is so warm. I would love to link to your how-to if you didn't mind.
Rachel says
where did you find the pencils photographed :)! love this idea!
Leah Bergman says
J. Crew, Target (dollar bin) and Urbanic!
msshopaholicdiaries says
I save a lot of my cool shaped glass containers from pesto, soda, pasta sauce, etc in hopes that I will find a DIY to use them for! This one is perfect and I'm definitely going to try it! Thanks for sharing.
-Felicia
lotussaturday.com
Adriane Witt says
Amazing idea to create these organizers by using glasses - nice color! Thanks!
Elizabeth says
I cannot wait to try this! I think it's perfect for my office space that I'm having a blast creating. 🙂 I'm thinking I'll try it in black paint, with metallic gold edging.
Niki says
Hello! These are awesome. Can you tell us what brand/color of spray paint you used? The copper I have used doesn't leave such a vibrant copper color as yours looks. Thank you!